Let's Learn x86-64 Assembly! Part 4 - More About Jumps Than You Wanted To Know
published on Jul 20 2025

This post is a part of a series on x86-64 assembly programming. Check out parts 0, 1, 2 and 3! .
The header image shows the #2 most-liked piece of internet communication ever made by the author, which humorously demonstrates the importance of this post's subject matter.
It's wild to think that I started this series almost five years ago. Back then, the intention was to share my notes from revitalizing my own knowledge of x86 assembly programming, and provide a starting point for anyone who'd like to explore that topic further: an intro to the environment, tools, and a brief overview of a subset of the x86-64 ISA. The latter was supposed to include a chapter on conditional instructions and controlling program flow, but I never got around to it, until now!
As it often happens with these things, I found that simple, naturally arising questions demanded rather in-depth answers, which I would prefer to not skip. As a result, this post touches on quite a bit more interesting stuff than just the topic of program flow.
This will also be the final post in the series. It has certainly been fun going back to revisit these topics and improving my own understanding of them, but I have other things I want to write about.
Introduction
If you've been following this tutorial, you might have noticed that we haven't really addressed how to skip executing certain instructions based on some condition, or how to repeat the execution of some instructions as long as some condition holds true. In other words, we haven't really talked about branches (ifs) and loops. And if you have programmed in any language at all, you know those are important. In fact, if the title image of this post is to be believed, those are all that there is to programming!
Assembly doesn't have branches or for loops in the same form as most high-level programming languages do. Instead, it provides basic building blocks which can be used to implement those abstractions. Those building blocks are the subject of this post.
Unconditional Jumps
Before we start looking at ifs and for loops, we have to study some instructions that modify program flow unconditionally. We have already seen those in this very tutorial, but we have not discussed them in detail. And yet, there is much detail to be discussed.
jmp
The jmp instruction is essentially the same thing as
goto - it tells the processor
to set the instruction pointer to a particular address, so that the next
instruction to execute will be fetched from there.
The above is correct, but it is also a simplification of what is actually
happening. In reality, an unassuming line like jmp some_label
could potentially be translated into raw machine code in several different ways
- the exact encoding is up to the assembler. It is actually quite interesting
to examine how an instruction like that can be encoded.
Take a look at this table of different JMP encodings from Felix Cloutier's website:
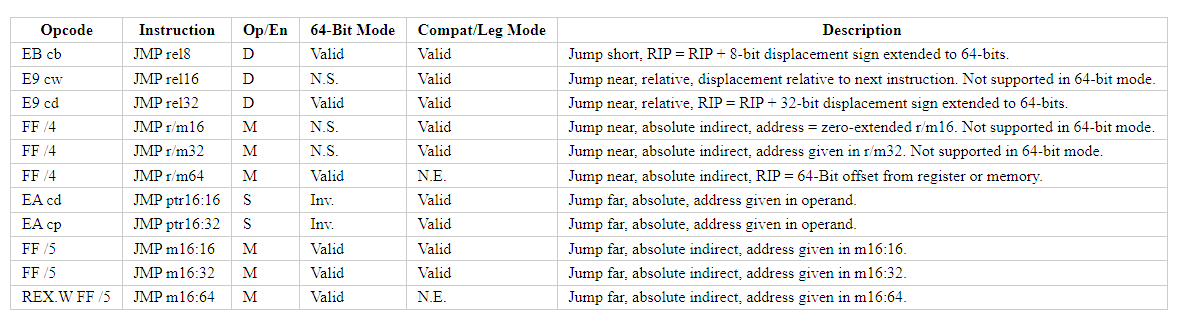
That's quite a few encodings! Lucky for us, only 6 of those are valid in 64-bit mode:
- Jump short, RIP = RIP + 8-bit displacement sign extended to 64-bits.
- Jump near, relative, RIP = RIP + 32-bit displacement sign extended to 64-bits.
- Jump near, absolute indirect, RIP = 64-Bit offset from register or memory.
- Jump far, absolute indirect, address given in m16:16.
- Jump far, absolute indirect, address given in m16:32.
- Jump far, absolute indirect, address given in m16:64.
Couple things to help you understand the list above. Firstly, RIP
refers to the "instruction pointer" register, this is where the processor stores
the address of the next instruction to execute. As you can see, relative
flavors of the jump instruction add a value to the instruction pointer.
Secondly, a "sign extension" means that when converting e.g. a 32-bit value to a
64-bit value, the sign bit of the old value is copied into the new extra bits.
This helps to preserve the meaning of the value, for example a 32-bit value
corresponding to the integer -42 will still correspond to
-42 when converted to 64 bits with sign extension. If you need a
refresher on integer representation and two's complement, see
part 3 of this tutorial.
Finally, a note about far jumps. Under the segmented memory model, a "far" jump
would take your program to a different segment of memory (the
m16 in the list stands in for the value that would be written to
the code segment register). However, we will ignore far jumps for the purposes
of this tutorial: programs running under a modern Windows operating system will
be using the flat memory model. The only reminder of the segmented memory model
that is still visible to Windows application programmers today are the empty
NEAR and FAR macros left in windows.h. Legend says it's for backwards
compatibility with old code, but the real purpose is delivering endless grief to
unsuspecting graphics programmers trying to write code dealing with near and far
clipping planes.
Now, we'll look at how FASM encodes jmp depending on the context in
which it is used. Let's open fasm and write the following simple program:
use64
format PE64 NX GUI 6.0
entry start

section '.text' code readable executable
start:
        int3
        jmp exitp
        nop
exitp:
        ret
As you can see, all it does is one single jump over a no-op instruction and then
exits (the int3 is a hardcoded breakpoint for the debugger, a trick
from all the way back in part 0).
Let's break out old trusty WinDbg and launch our exe. This time, pay attention
to the instruction encoding in the disassebly window:
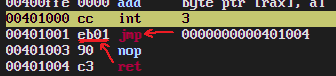
We can see that the encoding that FASM chose for our jump was
EB01. Referring back to the
table, we can see that the
opcode "EB" corresponds to "jump short relative". The "01" is the amount of
bytes to add to the instruction pointer, in this case it is 1 - just enough to
skip over the nop instruction, which we can see is encoded using
just a single byte, "90". So, FASM saw that the target label address was within
-128 to +127 bytes of the instruction being assembled, and decided to use that particular
encoding because it was the shortest. In general, FASM tries really hard to
always emit the shortest encoding possible. It tries so hard, in fact, that it
accidentally evolved a surprising ability to solve systems of simple linear
equations, as I explained in part 1 of
the tutorial.
We can make FASM emit a different encoding for the jump with this one weird trick:
use64
format PE64 NX GUI 6.0
entry start

section '.text' code readable executable
start:
        int3
        jmp exitp
        rept 256 { nop }
exitp:
        ret
The only difference between this and the preceding version of the program is that we inserted a bunch more NOPs before the jump's target label. Let's see what FASM produced:

A completely different encoding! It is now using opcode "E9" corresponding to near jump relative to the instruction pointer, with a 32-bit displacement encoded immediately after the opcode. This is because our NOPs have moved the jump's target too far away to be reached using the previous short jump.
Take a moment to appreciate that the same exact string, "jmp exitp" was assembled differently depending on the surrounding context!
Let's attempt an indirect jump too, for good measure:
use64
format PE64 NX GUI 6.0
entry start

section '.text' code readable executable
start:
        int3
        mov rdx, exitp
        jmp rdx
exitp:
        ret
This yields yet another encoding:

This time, the opcode FF is used, meaning "jump near, absolute indirect" since we're transfering control to an address loaded from a register. You can also see the actual address value being loaded into rdx by the preceding instruction.
Your Label Has Been Relocated
Take a look again at the last image in the previous section and really understand what's happening. We are loading a hard-coded value into a register and then setting our instruction pointer to the value contained in that register. And our program works every time. This tells us that the address we're jumping to will be valid and contain the same instructions every time we launch our program. How does this work?
In part 0 we had established that any program running under 64-bit Windows (or any modern OS with multitasking, really) sees the memory as a large contiguous array of bytes, which can be addressed starting at 0. This mechanism is called "virtual memory" - the program "thinks" it can see and access the entire address space, but in reality the addresses that the program uses ("virtual addresses") are translated automatically at runtime by the hardware (working in concert with the OS) to actual, physical addresses. Those physical addresses can be totally different every time the program is run, but as long as the OS consistently puts the code of the program at the same offsets in the virtual address space, the virtual addresses of labels and such will always point to the same instructions, and the application will remain none the wiser.
Indeed, this is what happens with our simple program. Astute readers might have noticed that the virtual address of the entry point to our program always stays the same: it's 0x00401000. This is not a random number, and Raymond Chen has even written a post about why that particular value is used.
But, you are not always guaranteed that your code will be consistently loaded at the same well-known base address. This is often the case with DLLs. When a dynamic library is loaded by some process, its code has to be mapped into the virtual address space of that process. A DLL might have some address that it would prefer to be loaded at, but it is not always guaranteed that enough space will be available starting at that offset in the host process virtual address space, so the DLL will simply have to be loaded to an offset that is different to its preferred one (this process is called "relocation").
However, DLLs are not the only thing that have to deal with being loaded at an unexpected offset. This can happen to regular executables too, but the reasons for that are more interesting.
Knowing the layout of the virtual address space (where the executable code is loaded, where the start of the stack and heap are guaranteed to be, etc.) enables attackers to exploit stack corruption using attacks like ROP or return-to-library in order to execute (almost) arbitrary code with the privileges of the compromised process. The gist of it is that even if the victim system has a non-executable stack, you can still execute some code that wasn't intended to be executed by flooding the stack with a bunch of very carefully chosen addresses. Each address has to point to a piece of executable code that disassembles to a few of the instructions that the attacker wants executed, followed by a ret (such group of instructions is often referred to as a "gadget"). A large enough binary or library is almost guaranteed to contain enough gadgets to put together a shellcode, or whatever else an attacker might want. If this sounds too unbelievable, go read the post about how the PS4 was hacked.
These types of attacks rely on knowing where to look for gadgets. This means that we can't have nice things: in order to hinder a whole class of potential attacks, executables have to be loaded at random offsets, which makes ROP-style attacks very hard (though not entirely impossible). This mitigation, which is quite ubiquitous these days, is called Address Space Layout Randomization, or ASLR for short. ASLR, like many things in computer security, is a technical artifact that owes its entire existence solely to the wretched, sinful nature of man. Keep that one in your back pocket for the next time someone tries to tell you tech is not political.
The main reason I took all this time to talk about dynamic libraries, exploits
and ASLR is to impart on you, the reader, that the last encoding of
jmp that we saw is a happy-go-lucky case indeed.
A lot of the time in practice we'd have to deal with code that is resilient to
being loaded at any offset. You will often hear such code referred to as
"relocatable" or "position independent". These terms have distinct meanings, and
I will now take a brief moment to explain the difference.
"Relocatable" code assumes that it will be loaded at some known ("preferred") offset. It also carries around a bunch of metadata (called "relocation table"). The OS' dynamic linker uses that data to go and fix up all the addresses in the code whenever the it has to be loaded at an offset different from its preferred one.
On the other hand, "position-independent" code does not carry around any relocation metadata, because it makes no assumptions at all about its base address in the first place.
Our little program is neither relocatable nor position-independent, and to demonstrate that, we will now proceed to break our executable. EXE and DLL files come in the "Portable Executable" format, which contains lots of metadata for the OS's linker and loader. Some parts of this metadata are used by the OS to determine whether a particular exe or library can be loaded at an arbitrary offset. Just for fun, we are going to surgically alter those parts to pretend our binary is ASLR-compatible, and watch it crash and burn.
Grab yourself a copy of PE Tools - it's a sort of all-encompassing toolkit for dealing with PE files. Launch PETools.exe, go to Tools > PE Editor and select the executable that FASM produced for us. You will see something like this:
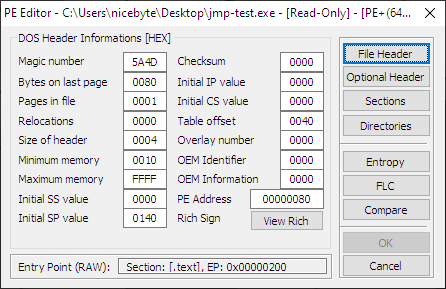
Click the "File Header" button, and in the popup dialog that opens, click the button next to "characteristics":
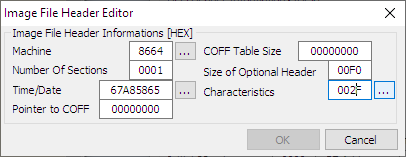
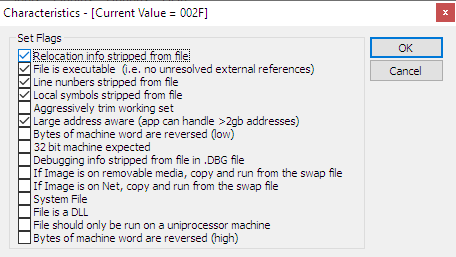
Uncheck the "relocation info stripped from file" and click OK. Click OK in the image file header editor too. Back in the main PE editor dialog, click the "optional header" button, and in the dialog that shows up, click the button next to "DLL characteristics":
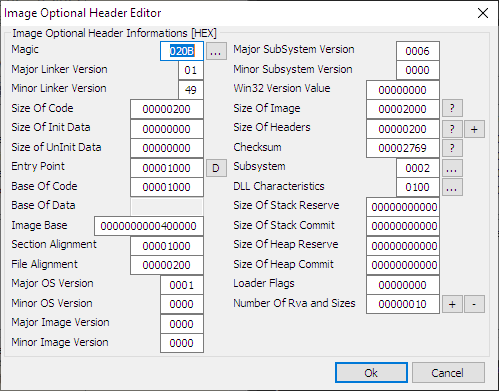
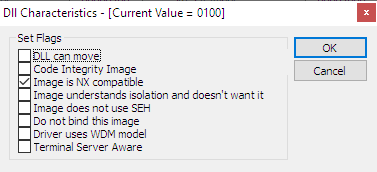
Check the "DLL can move" flag (ignore the fact that it refers to a DLL while we're editing an EXE, the flag is the same for both). Click OK in all dialogs and exit PE tools.
Now, load our doctored exe in WinDbg and run to our hardcoded breakpoint. If you did everything right in the preceding steps, and your system has ASLR enabled (which is quite likely) then you should see a very different virtual address:

But note that the hardcoded address that we put into rdx did not change. If we continue running our executable now, we will eventually attempt to jump to that very address, but this time it won't contain any meaningful instructions and the program will crash.
In this case, there is actually a simple way to fix this
and make our code position-independent. All we need to do is to calculate what
the target address would be relative to the current value of the
instruction pointer at the time when we're loading the rdx
register, and add the current value of the instruction pointer to that relative
address, in one fell swoop. Lucky for us, the LEA instruction on x86-64 can do
exactly that:
use64
format PE64 NX GUI 6.0
entry start

section '.text' code readable executable
start:
        int3
        lea rdx, [rip+(exitp-next)]
next:   jmp rdx
        rept 45 { nop }
exitp:
        ret
exitp-next is exactly the number of bytes that would need to be
added to rip at the moment lea starts executing in order for
it to start pointing to that last ret instruction. It's a constant
offset known at assembly time, and lea can add a constant to
rip and store the result of the register. After lea
finishes, the rdx register will contain the absolute value of the address we
actually need to jump to.
If you compile this code now, and repeat the whole ritual with PETools again to trick Windows into engaging ASLR for our exe, you will see in WinDbg that the OS loaded us at a random virtual address, but this time, when you run your program to completion, it will not crash. Congrats, you have successfully written some position-independent code!
As a side note: this RIP-relative addressing trick works only on x86-64. The 32-bit ISA does not support RIP-relative addressing. It's still possible to write position-independent code using the same general idea, but you need to jump through hoops to get the value of the instruction pointer into a register and then separately add the necessary offset to it.
call and ret
call is another one of those instructions we have seen before (all
the way back in part 0!). A lot of what
needs to be said about call has kind of already been said.
In particular, all of the discussion regarding jmp above (different
encodings, position-independent code, relocations, etc.) also applies to
call. In fact, call is equivalent to jmp
in almost every way except for one: it provides the ability for execution to
eventually return to the call site, and resume from there.
This is accomplished by automatically saving the current value of the
rip register onto the stack before jumping to the destination
address. When a ret instruction is encountered later in the
execution, the address at the current top of the stack is popped off, and
rip is set to that value.
call and ret constitute the primary mechanism by which
higher level languages like C perform function calls. However, the x86-64
architecture doesn't mandate any specific way to pass arguments and return
values between functions and their callers. In fact, the exact way to pass data
between functions is entirely a matter of convention - an implicit
contract between functions and callers.
We have actually discussed calling conventions in some detail in part 0 and even implemented a part of the Win64 calling convention in part 1 using the awesome powers of FASM macros. Therefore, I will not repeat what has already been said here. I will just reiterate that a calling convention is simply a set of agreed upon rules and nothing more - it is not actually somehow enforced by the hardware. In fact, if you are manually programming in assembly and aren't calling any external code (and do not expect any external code to be calling your code), you are under no obligation to follow any specific calling convention at all.
One final tidbit I want to add here is of no practical relevance on modern
hardware, but more of a historical interest. If you look up the ret
instruction in the Intel manuals you will see that it has "near" and "far"
flavors, just like jmp and call. This makes sense:
after all, it is modifying the address at which the program is executed and the old
segmented memory model requires you to specify whether the new address is in the
same segment or not. In case of jmp and call you might
at least have some idea whether your target address is near or far. But with
ret you really have to know how the function was called.
Doing a "near" return when the caller was, in fact, in a different segment
would have bad consequences. Thus the "nearness/farness" sort of becomes part
of the calling convention. I would imagine, writing "far" wrappers around
other code just so that it could be called from a different segment wasn't too
uncommon. Astute readers might ask: even with segmented memory model, why is
there a need for two flavors to exist? Why not just use "far" for all
calls and jumps across the board? The answer would be performance - far calls
and jumps had a higher runtime cost associated with them. Anyway, I am very
thankful for the modern flat memory model.
syscall
I had an internal debate whether to include this section into a post that is ostensibly about program flow control instructions. Ultimately I decided to do so, because looking at this instruction is very interesting and will teach us about how programs interact with the operating system running them.
syscall is quite special. Let's see what the Intel manual has to
say about it:
SYSCALL invokes an OS system-call handler at privilege level 0. It does so by loading RIP from the IA32_LSTAR MSR (after saving the address of the instruction following SYSCALL into RCX).
In normal-person language that really means the following: executing
syscall saves the return address into the rcx
register, and transfers execution to the operating system, specifically the part
of it called the "system-call handler". The processor knows where to find the
OS system-call handler, because the system-call handler's address is loaded by
the OS itself into a specific control register (IA32_LSTAR) at some point.
What is a "system-call"? You can think of system calls as services provided by the operating system to the programs. The operating system kernel executes with a higher level of privelege than normal user-space programs. The OS is allowed to do practically anything with the hardware directly, whereas user-space programs can do almost nothing. If user-space programs want to do anything remotely interesting (such as reading or writing a file, or even allocating memory), it requires going through the OS as an intermediary. Syscalls are "polite requests" for the OS to do something on behalf of the user program, they help to cross the privelege boundary in a controlled manner.
Of course, if you have read any of the prior posts in this series, you might say: we have done quite a lot, like displaying a whole graphical dialog box in our very first program, so how come we have never encountered even a single syscall instruction?
The answer to that has to do with a specific design decision made by the authors
of the Windows operating system. You see, syscall by itself just provides a way
to cross that privilege boundary between the application and the OS, but
everything else - like specifying what exactly the program would like
the OS to do on its behalf - is left up to convention. The OS and programs have
to agree on some sort of contract and maintain it. It just so happens that
Windows abstracts this contract away from the applications. The "official" way
to get the OS to do stuff for you is to call the Windows API functions, and the
implementations of those will eventually invoke syscall following
the appropriate convention. All of that is not to say that Windows syscalls are
shrouded in mystery - they are in fact well-known - but things ebb and flow and
change from version to version, so using syscalls directly in any software that
you'd like to be compatible with future versions of the OS is probably unwise.
In contrast to Windows, Linux has a well-documented set of syscalls and they never break backwards compatibility. Because of that, this will be the only part of the series where we will briefly abandon the familiar land of Windows and dip our toes into other operating systems.
I want to demonstrate the usage of syscall by writing a program that prints a message to the standard output without using printf or any standard library routines at all.
For this one, you will need a Linux environment (WSL will do nicely), and the GNU Assembler and the ld linker (which should already be installed if you have the GNU C Compiler). Our demo program will be really short:
.intel_syntax noprefix
.section .rodata
.hello:
        .ascii "HELLO\n"

.section .text
.globl _start

_start:
        mov rax, 1
        mov rdi, 1
        mov rsi, offset .hello
        mov rdx, 6
        syscall

        mov rax, 60
        mov rdi, 0
        syscall
To run this program, save its text to a file called "hello.s", and then run the following two commands from the command line:
- as hello.s -o hello.o
- ld hello.o -o hello
hello, you should see a greeting.
Let's examine closer what's happening here. The first thing you'll notice is that
the boilerplate stuff is a bit different from what we are used to, but that's just
because of using a different assembler. What we're actually interested in is
what's happening right after _start - that's where our program will
start its execution.
The Linux syscall ABI for x86_64 is as follows. The calling application shall
place the system call number into rax. This number indicates the type of service
that the calling program is requesting from the OS.
The return value of the syscall shall be passed to the application in rax.
Syscalls may have up to 6 arguments, which should be placed in registers
rdi, rsi, rdx, r10, r8 and r9 respectively. Once appropriate values have been
stored in these registers, executing the syscall instruction will
cause the kernel to work its magic.
Our little example uses two syscalls - "write" (number 1) and "exit" (number 60). "Write" writes given bytes to a given file, while "exit" exits the program with the specified return code.
We start by placing 1 into rax, which corresponds to the "write" syscall. This
syscall has three parameters: the handle of the file to write to, a pointer to
the source buffer containing the data to write, and the number of bytes to write
from the source buffer into the destination file. In our case, we use "1" as the
file handle, which is a special handle used to indicate the standard output.
Then we load up the other two argument registers with the pointer to a buffer
with our message, and the length of the message. Finally, we invoke syscall.
The story with the "exit" syscall is even simpler, we just need to place our
program's return code into rdi. The result is the most bare-bones
linux hello world program that I can write.
Comparison
So far, we've looked at instructions that alter program flow unconditionally.
It is time to investigate the instructions that do so based on some condition,
so that we can finally understand how ifs and for loops work. There are many
conditional jump instructions. The one thing they all have in common is that
they alter the value of the instruction pointer if some condition is true - the
particular condition depends on the instruction itself and is usually based on
the values of bits from the rflags register. Understanding the
meaning of some of these flags and the situations when they become 1 or 0 is a
prerequisite for understanding conditional jump instructions. Therefore, before
looking at conditional jumps, we need to learn about another instruction -
cmp
cmp is a convenient instruction that works exactly the same way as
our old friend sub which we had seen back in
part 3: it
subtracts its operands. The main difference between cmp and
sub is the fact that cmp does not actually store the
result of the subtraction in any register. Instead, it only updates the
rflags register as if a subtraction were performed.
For example, if the operands of the cmp instruction are equal, the
result of subtracting them would be zero. Therefore, if the zero flag is set to
1 after executing a cmp instruction, we can be confident that the values being
compared were equal.
What if the zero flag is set to 0 though? Clearly, in that case the values were not equal, but can we say whether one is greater than the other based on the values of some other flags? Turns out, yes! However, it is a bit more tricky, because the outcome actually depends on whether our program interprets the values being compared as signed or unsigned.
Recall our discussion of integer representation from part 3, specifically two's complement. For simplicity, let's assume a maximum length of 8 bits. The 8 bit string 0000 0010 is interpreted as 2 regardless of whether we treat it as signed or unsigned. On the other hand, the bit string 1000 0000 might mean either 128 (if we treat it as unsigned) or -128 (if we assume it is signed and using two's complement). Obviously, the result of comparing 0000 0010 to 1000 0000 is completely different depending on whether we interpret them as signed or unsigned.
The underlying machinery performing the arithmetic really does not care about "signedness" - it does the same things and sets the status flags according to the same rules either way. It is up to the application itself to treat a particular bit string as a "signed" or "unsigned" integer. Depending on how the application wants to interpret the inputs to the comparison, it should treat the zero, carry, sign and overflow flags differently in order to determine the outcome.
Because those flags are so important for the conditional jump instructions, I want to make sure there is an understanding of how they work before we move on.
- The carry flag is set to 1 if 1 had to be carried over as a result of performing addition on the highest-order bits (e.g.: 1000 0000 + 1000 0000) OR if a borrow was necessary when when performing subtraction on the highest-order bits of the operands (e.g.: 0100 0000 - 1000 0000);
- the overflow flag is set to 1 if the result of the operation does not fit into the range afforded by two's complement representation.
To explain the behavior of the overflow flag in a bit more detail, let's consider the following example. Assume we have 8 bits to deal with, and add 1 (bit string 0000 0001) to 127 (bit string 0111 1111). This would result in 128 (bit string 1000 0000). This is valid if we are dealing with unsigned arithmetic (i.e. are treating the inputs and the result as unsigned numbers). However, if we assumed signed arithmetic, this would be a problem: given 8 bits, two's complement representation allows us to deal with numbers from -128 up to and including 127. 128 is out of that range. The overflow flag lets us know that this happened.
To hammer the point home, here is another example: subtracting 0000 0001 from 1000 0000. The result is 0111 1111. Under unsigned interpretation, this is just 128 - 1 = 127, which makes sense. However, under signed interpretation, this is -128 - 1, which should be -129, but there is no 8-bit bitstring to represent that quantity - we just end up looping over back to the range of positive numbers. Therefore, this operation would cause the overflow flag to be set.
Another way to think of the overflow flag is that it gets set whenever the result does not make mathematical sense under signed arithmetic interpretation:
- adding two positives resulting in a negative - just like in the example above, 0000 0001 + 0111 1111 = 1000 0000 - note how both sign bits of inputs are 0 (meaning they are positive) but the sign bit of the result is 1 (negative);
- adding two negatives resulting in a positive;
- subtracting a negative from a positive resulting in a negative;
- subtracting a positive from a negative resulting in a positive.
Conditional Instructions
Jump if Zero
The simplest conditional instruction, jz,
executes a jump if the zero flag in
rflags was set by a previous instruction. For example, if
the result of a subtraction was zero, the zero flag would be set. jz's
counterpart, jnz, executes the jump if the zero flag in rflags
is not set. These give us a way to implement an equality check:
...
cmp rax, 5  ; Compare rax to 5. This will set the zero flag if 5 is stored in rax.
jz  mylabel ; Jump to mylabel if rax was equal to 5.
...
mylabel:
...
A similar instruction is jrcxz. It executes the jump if the
value contained in the register rcx is zero. However, it's a bit
of an oddball. First, this instruction can only be used for short jumps - the
target address cannot be more than about 127 bytes away from the jump instruction
itself. Second, there is no jnrcxz counterpart.
Intermission: Conditional Jump to Absolute Address
One thing that might trip you up about jz and jnz is
the fact that they can't be used to jump to an absolute address. In fact, this
limitation applies not only to jz and jnz, but to
all conditional jumps. Yes, if you consult the manuals, there is simply
no encoding for jumping to an absolute address conditionally. And yet, code like
the following works:
xor rcx, rcx
jz  mylabel
The reason it works is that jumps to labels are encoded using relative addressing: the assembler computes the address of the label relative to the address of the conditional jump instruction, and uses that value as the operand.
However, let's say you want to transfer execution to an absolute address stored in register rdx if the result of a prior operation is 0. Something like this will fail:
xor rcx, rcx
jz  rdx
There is simply no encoding for "jump to the absolute address specified in this register". Worse yet, we can't compute the relative address and put it in a register: the jump instructions demand the provided address to be an immediate value. The usual way to get around this is to employ an unconditional jump to actually transfer the execution to the desired address, but skip it conditionally:
xor rcx, rcx
jnz  skip_jump
jmp rdx
skip_jump:
Jump if Above/Below
The conditional jump instructions in this group interpret the contents of the
flags register as if we were comparing unsigned quantities. When comparing
unsigned quantities, we only really have to care about the carry flag:
if cmp generated a borrow when subtracting the highest-order bits
of the operands, then the value being subtracted is larger than the value it is
being subtracted from. When comparing unsigned quantities, the overflow flag
does not have any particular meaning, so we ignore it.
I summarized the instructions into a little table below (reminder that "zero flag is 0" means that the result of the subtraction is NOT zero, i.e. the quantities are not equal):
| Instruction | Condition that triggers the jump | What it means for the previous cmp |
| ja | carry flag is 0 and zero flag is 0 | first operand > second operand |
| jb | carry flag is 1 | first operand < second operand |
| jae | carry flag is 0 | first operand >= second operand |
| jbe | carry flag is 1 or zero flag is 1 | first operand <= second operand |
Jump if Greater/Less
The conditional jump instructions in this group interpret the contents of the flag register as if we were comparing signed quantities. Here is a summary table.
| Instruction | Condition that triggers the jump | What it means for the previous cmp |
| jg | zero flag is 0 AND sign flag is equal to overflow flag | first operand > second operand |
| jl | sign flag is not equal to overflow flag | first operand < second operand |
| jge | sign flag is equal to overflow flag | first operand >= second operand |
| jle | zero flag is 1 OR sign flag is not equal to overflow flag | first operand <= second operand |
It might be a bit unintuitive that the sign flag is compared to the overflow flag. With a bit of thinking, it's not too difficult to understand why though. If there was no overflow, the overflow flag is 0. In this case, all we have to do is look at the sign bit: if it's 0 (the result is positive), it means that the value from which we were subtracting was greater than the quantity being subtracted. If it's 1 (the result is negative), it means the opposite. However, if an overflow did occur, the meaning of the sign bit is inverted: for example, in case of an overflow, a positive sign bit indicates that the result should have been negative, but the difference was so large that we ended up looping over to the positive side!
Conditional Move
The final group of instructions we'll mention are the conditional move instructions. Unlike the conditional jump instructions, they don't modify the instruction pointer. Instead, they perform a move operation if a particular condition is true. The instructions are: cmov[a|b|ae|be] for unsigned comparisons and cmov[g|l|ge|le] for signed comparisons. The meaning of the suffixes is exactly the same as for the jump instructions. Here is an example of how the logic of C++'s ternary operator could be implemented without any jumps:
; rax = rbx > 0xfe ? 0xdeadbeef : 0
xor rax, rax
mov rdx, 0xdeadbeef
cmp rbx, 0xfe
cmova rax, rdx
Note how in the above example we have to put the value into rdx instead of using it directly with cmov. That is because cmov does not have encodings that support moving an immediate value - the destination MUST be a register, whereas the source MUST be a register or memory.
Example: A Loop in Assembly
We now know everything necessary to write ifs and loops in assembly:
; compute fibonacci sequence up to 13
mov rax, 0
mov rbx, 1
_loop:
mov rcx, rbx
add rbx, rax
mov rax, rcx
cmp rbx, 13
jnz _loop
Epilogue
I hope you've learned something new while following this series of posts. If you're interested in continuing the x86-64 assembly journey, I would recommend perusing Creel's and Tomasz Grysztar's Youtube channels.
If you are interested in trying out ARM assembly, I would recommend starting with the turorial from Azeria Labs.
Finally, thanks to the authors of all the keygens that i definitely did not use to run cracked software on my pentium 3, to Ilfak Guilfanov for Interactive Disassembler, and to my childhood friend Minas who gave me a copy of flat assembler on a floppy disk back in about 2003 and most likely doesn't even remember it. All these little factors inspired my interest in low-level programming and reverse engineering, without which this series would probably not exist.
Like this post? Follow me on bluesky for more!